Introduction
![]()
Welcome to the Sandhole book. This is a guide on how to install, configure, and use an instance of Sandhole.
About the project
Sandhole is an unconventional reverse proxy which uses the built-in reverse port forwarding from OpenSSH, allowing services to expose themselves to the Internet with minimal configuration. This is especially useful for services behind NAT, but you may also want this for:
- Quickly prototyping websites, APIs, and TCP services, and sharing them with others.
- Exposing endpoints or ports on IoT devices, game servers, and other applications.
- Hosting a dual-stack HTTP+SSH service (via ProxyJump), such as a Git instance.
- Handling a multi-tenant network with several websites under the same domain.
- Using the tunnel for peer-to-peer connections, or even as a basic VPN.
- And possibly more!
Quick start
In order to run Sandhole, you'll need:
- A server with at least one public address.
- A domain (for example,
sandhole.com) and its subdomains (*.sandhole.com) pointing to said server.
Then, install the Sandhole binary in your server. Currently, you can do so through Docker Compose, by downloading a binary from the latest release, or by compiling it yourself.
Compiling from source
For this, you'll require Cargo and Rust to be installed.
If you're compiling from a separate workstation than the one that will be running Sandhole, then grab the source files, build the binary, and copy it over:
git clone https://github.com/EpicEric/sandhole
cd sandhole
cargo build --release
scp target/release/sandhole user@sandhole.com:/usr/local/bin/sandhole
If you're compiling on the machine that's running Sandhole, you can install it directly with cargo install. This should also add sandhole to your PATH:
cargo install --git https://github.com/EpicEric/sandhole
# -- OR --
git clone https://github.com/EpicEric/sandhole
cargo install --path sandhole
# -- OR --
cargo install sandhole  # Installs from latest release sources uploaded to crates.io
Once this is all done, you can start running Sandhole! Just make sure that it points to your own domain:
sandhole --domain sandhole.com
By default, this will expose ports 80 (for HTTP), 443 (for HTTPS), and 2222 (for SSH). If it all succeeds, you should see the following:
[2024-11-03T13:10:51Z INFO  sandhole] Starting Sandhole...
[2024-11-03T13:10:51Z INFO  sandhole] Key file not found. Creating...
[2024-11-03T13:10:51Z INFO  sandhole] Listening for HTTP connections on port 80.
[2024-11-03T13:10:51Z INFO  sandhole] Listening for HTTPS connections on port 443.
[2024-11-03T13:10:51Z INFO  sandhole] Listening for SSH connections on port 2222.
[2024-11-03T13:10:51Z INFO  sandhole] Sandhole is now running.
Now you're ready to dig sandholes like a crab!
Using Docker Compose
The most straightforward way to have Sandhole up and running is with Docker Compose. Mainly, this takes care of running dnsrobocert for you, and daemonizes your application.
For this, you'll first need to install Docker Engine on your server.
An example configuration is provided in the repository's docker-compose-example directory, using sandhole.com as the example domain and Hetzner as the DNS provider for DNS-01 challenges. Adjust the compose.yml and le-config.yml files as necessary.
Then, simply run:
docker compose up -d
You should also re-run this command whenever you make changes to your configuration and/or after you update to the latest image (docker compose pull). See the official Docker Compose documentation for more information.
Configuration
This is a list of the most important default settings to be aware of. For a comprehensive list, refer to the CLI options.
Adding users and admins
In order to do anything useful with Sandhole, connections must be authenticated. The main way of doing this is by adding your users' public keys to the user keys directory.
By default, this will be ./deploy/user_keys/, but it can be configured with the --user-keys-directory option. Once you add a public key, Sandhole will automatically pick up on the change, and allow that user to create remote port forwardings.
Similarly, there is a ./deploy/admin_keys/ directory (set by --admin-keys-directory), for users who should also have access to the admin interface and no quota restrictions.
Default ports
By default, Sandhole runs on ports 80, 443, and 2222. This assumes that your actual SSH server is running on port 22, and that no other services are listening on the HTTP/HTTPS ports.
However, it might be more desirable to have Sandhole listen on port 22 instead. In order to keep your SSH server running on a different port, edit the port in /etc/ssh/sshd_config, then restart your SSH daemon.
Now you'll be able to run Sandhole on port 22:
sandhole --domain server.com --ssh-port 22
What if I need to run another service on HTTP/HTTPS?
It's simple: just let Sandhole take care of that for you! Nothing stops you from connecting to Sandhole on the localhost, and just like any proxy, it will redirect the traffic appropriately for you. See more on "exposing your first service".
Allow binding on any subdomains/ports
Without extra configuration, Sandhole will not let users bind to requested subdomains and ports, and will always allocate a random one instead.
If you wish to change the default behavior, and allow users to provide their own subdomains/ports to bind to, add the options --allow-provided-subdomains and --allow-requested-ports, respectively.
Otherwise, if you wish the subdomains to still be random, but persist between requests/disconnections, check out the --random-subdomain-seed option in the command-line interface.
Alternative authentication with password
In some scenarios, it makes more sense to authenticate users dynamically with a password, rather than manually adding public keys to a directory.
For such use cases, you can provide a URL to --password-authentication-url. This should be running an HTTP or HTTPS service which accepts a POST request with a JSON body containing the user's credentials, and returns 2xx on successful authentication. This is what the JSON payload looks like:
{
  "user": "eric",
  "password": "super$ecret123",
  "remote_address": "[::ffff:10.0.5.32]:12703"
}
Restricting resources for users
By default, users are able to bind as many services as they want. In order to limit this amount, Sandhole provides the --quota-per-user option, which must be a number greater than 0. The user's quota includes all services across HTTP, SSH, and TCP.
To enforce this quota across multiple connections, a user is purpoted to be any forwardings sharing the same public key. In the case of password-authenticated users, their username will be considered instead.
The quota is not enforced for admin users.
TLS support
Sandhole supports TLS signing out of the box, including ACME challenges via TLS-ALPN-01 for custom domains.
However, especially for your main domain, it's recommended that you set up a tool like dnsrobocert to handle the wildcard certification via DNS. Sandhole already matches dnsrobocert's output directly. Please see its documentation to set it up yourself.
Assuming that the output of dnsrobocert is ./letsencrypt, Sandhole can then read the certificates via:
sandhole --domain sandhole.com --certificates-directory ./letsencrypt/live
ACME support
Adding ACME support is as simple as adding your contact e-mail address via --acme-contact-email you@your.email.com, but first, make sure that you agree to the Let's Encrypt Subscriber Agreement (available here). Sandhole will automatically manage the cache for your account and any certificates generated this way.
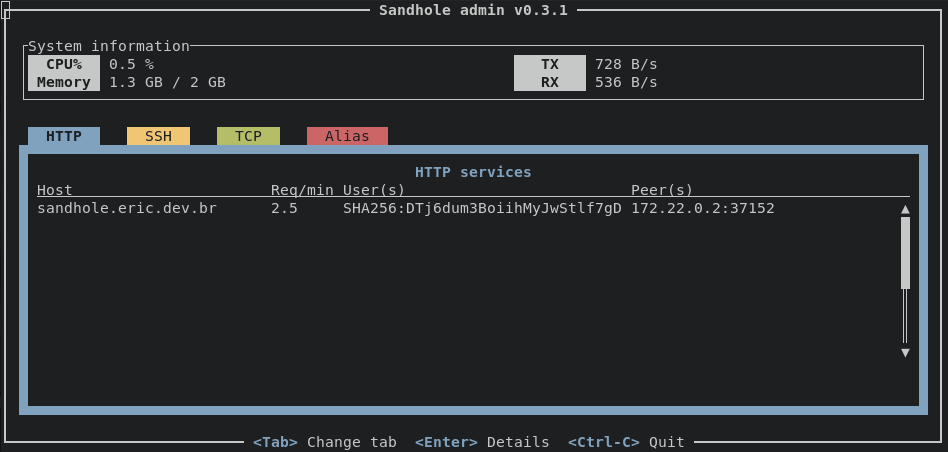
Admin interface
Sandhole comes with a command-line admin interface available through SSH, which displays information about the system, as well as specific connections. In order to access it, you must be a user with admin credentials.
To access it, simply run the command:
ssh -t sandhole.com -p 2222 admin
where sandhole.com is your hostname and 2222 is Sandhole's SSH port.
Exposing your first service
Now that you have a Sandhole instance running, and you authorized your public key, you can expose a local service through Sandhole. Assuming that your local HTTP service is running on port 3000, and that Sandhole is listening on sandhole.com:2222, all you have to do is run
ssh -i /your/private/key -R 80:localhost:3000 sandhole.com -p 2222
Yep, that's it! Sandhole will log that HTTP is being served for you on a certain subdomain, and you can access the provided URL to see that your service is available to the public.
For HTTP and HTTPS services, Websockets work out of the box.
Requesting multiple tunnels
You can request tunnels for several services in a single SSH command.
ssh -i /your/private/key -R 80:localhost:3000 -R 80:localhost:4000 -R 22:localhost:5000 sandhole.com -p 2222
Requesting a particular subdomain/port
After the server owner allows binding on any subdomain/port, it's possible to configure which will be assigned to you.
For example, to bind under test.sandhole.com, we could use either of these commands:
ssh -i /your/private/key -R test:80:localhost:3000 sandhole.com -p 2222
# -- OR --
ssh -i /your/private/key -R test.sandhole.com:80:localhost:3000 sandhole.com -p 2222
And if we'd like to bind to a specific port, say 4321:
ssh -i /your/private/key -R 4321:localhost:3000 sandhole.com -p 2222
# -- OR --
ssh -i /your/private/key -R localhost:4321:localhost:3000 sandhole.com -p 2222
Connecting with user + password
If you'd like to connect with a password instead of your public key, make sure that HTTP(S) login has been enabled by the administrator, then run:
ssh -o PubkeyAuthentication=no -o PreferredAuthentications=password username@sandhole.com -p 2222 ...
Automatic reconnection
If you'd like to have persistent tunnels, use a tool like autossh with the -M 0 option to automatically reconnect when disconnected. Note that you'll be assigned a new subdomain/port if the option above is not enabled, depending on the server configuration.
Local forwarding and aliasing
In addition to remote port forwarding, Sandhole also supports local port forwarding by default. This allows you to create SSH-based tunnels to connect to a service.
Given a remote service running as
ssh -R my.tunnel:3000:localhost:2000 sandhole.com -p 2222
Note that the server won't listen on port 3000; instead, you can establish a local forward to the port from your machine:
ssh -L 4000:my.tunnel:3000
Then you can access localhost:4000, and all traffic will be redirected to port 2000 on the remote service. It's almost like a VPN!
Enforcing local forwarding
Local forwarding is always enabled for SSH hosts, and is conditionally enabled for TCP hosts that have a requested address different from localhost.
To enable local forwarding for HTTP hosts, pass either the tcp-alias or the allowed-fingerprints command to the remote forwarding command as follows:
ssh -R my.tunnel:80:localhost:8080 sandhole.com -p 2222 tcp-alias
Restricting access to local forwardings
If you'd like to restrict which users can access your service, you can provide the allowed fingerprints as a comma-separated list at the end of the command, like so:
ssh -R my.tunnel:3000:localhost:2000 sandhole.com -p 2222 allowed-fingerprints=SHA256:GehKyA21BBK6eJCouziacUmqYDNl8BPMGG0CTtLSrbQ,SHA256:bwf4FDtNeZzFv8xHBzHJwRpDRxssCll8w2tCHFC9n1o
Disabling local forwarding
The administrator can disable all local forwardings with the --disable-aliasing CLI flag.
Advanced uses
Connecting to SSH via the HTTPS port
In some networks, outbound connections to 22 (or 2222) may be blocked by the operator. In Sandhole, it's possible to get around this with the --connect-ssh-on-https-port option.
Once your administrator has configured it, you can then expose your services with:
ssh -R example:80:localhost:3000 sandhole.com -p 443
Custom domains
You can also use your custom domains with Sandhole. For this, you'll need your SSH key's fingerprint and control over your domain's DNS.
For the former, you can run ssh-keygen -lf /path/to/private/key and take note of the second field - it will look something like:
SHA256:bwf4FDtNeZzFv8xHBzHJwRpDRxssCll8w2tCHFC9n1o
Then, add the following entries to your DNS (assuming that your custom domain is my.domain.net):
| Type | Domain | Data |
|---|---|---|
| CNAME | my.domain.net | sandhole.com |
| TXT | _sandhole.my.domain.net | SHA256:bwf4FDtNeZzFv8xHBzHJwRpDRxssCll8w2tCHFC9n1o |
This instructs your DNS to redirect requests to Sandhole, and tells Sandhole to authorize your SSH key for the given domain, respectively.
If you need to use multiple keys for the same domain, simply add a TXT record for each one.
Then, expose your service at the given domain:
ssh -R my.domain.net:80:localhost:3000 sandhole.com -p 2222
HTTPS support
If your administrator has configured ACME support, you don't need any extra steps. HTTPS will be automatically provisioned for your custom domain.
However, if you require DNS challenges for your domain's certification for any reason, and your administrator is running dnsrobocert, you can simply set another DNS entry:
| Type | Domain | Data |
|---|---|---|
| CNAME | _acme-challenge.my.domain.net | _acme-challenge.my.domain.net.sandhole.com |
This lets dnsrobocert manage the ACME challenge for you, as long as the admin updates its configuration.
Frequently asked questions
How do I expose my service on multiple URLs (for example, website.com and www.website.com)?
ssh -R website.com:80:localhost:3000 -R www.website.com:80:localhost:3000 sandhole.com -p 2222
See "Advanced Uses" on how to add custom domains.
How do I connect to a forwarded SSH server?
Use ssh -J sandhole.com:2222 mysshserver.com -p 2222 (replace the ports with Sandhole's SSH port if not using the default 2222).
If you'd like to avoid typing out the proxy jump command every time, make sure to edit your SSH config file (usually ~/.ssh/config) and add the following entry (changing the port where appropriate):
Host mysshserver.com
	ProxyJump sandhole.com:2222
	Port 2222
How do I enable Websockets?
Websockets are always enabled for HTTP services.
How do I disable HTTP/TCP/aliasing?
With the --disable--http, --disable-tcp, and --disable-aliasing CLI flags respectively. Note that you cannot disable all three at once.
How do I prevent multiple services from load-balancing?
With the --load-balancing=deny or --load-balancing=replace CLI flag.
How do I force HTTP requests to get redirected to HTTPS?
With the --force-https CLI flag, or by passing force-https on the tunneling connection(s):
ssh -R website.com:80:localhost:3000 sandhole.com -p 2222 force-https
How do I allow/block certain IP ranges?
With the --ip-allowlist and --ip-blocklist CLI flags respectively, or by passing ip-allowist=... and/or ip-blocklist=... on the tunneling connection(s):
ssh -R website.com:80:localhost:3000 sandhole.com -p 2222 ip-allowlist=10.0.0.0/8 ip-blocklist=10.1.0.0/16
How do I run the Docker container without mounting root certificates from the host?
Simply build an Alpine image with ca-certificates and sandhole installed, for example:
FROM alpine:3.21
RUN apk add --no-cache ca-certificates
COPY --from=epiceric/sandhole:latest /sandhole /sandhole
ENTRYPOINT [ "/sandhole" ]
If you don't need the HTTPS login API functionality, you can skip mounting the certificates directory, and just use the plain Docker image.
Command-line interface options
Sandhole exposes several options, which you can see by running sandhole --help.
Expose HTTP/SSH/TCP services through SSH port forwarding.

Usage: sandhole [OPTIONS] --domain <DOMAIN>

Options:
      --domain <DOMAIN>
          The root domain of the application

      --domain-redirect <URL>
          Where to redirect requests to the root domain

          [default: https://github.com/EpicEric/sandhole]

      --user-keys-directory <DIRECTORY>
          Directory containing public keys of authorized users. Each file must
          contain at least one key

          [default: ./deploy/user_keys/]

      --admin-keys-directory <DIRECTORY>
          Directory containing public keys of admin users. Each file must
          contain at least one key

          [default: ./deploy/admin_keys/]

      --certificates-directory <DIRECTORY>
          Directory containing SSL certificates and keys. Each sub-directory
          inside of this one must contain a certificate chain in a fullchain.pem
          file and its private key in a privkey.pem file

          [default: ./deploy/certificates/]

      --acme-cache-directory <DIRECTORY>
          Directory to use as a cache for Let's Encrypt's account and
          certificates. This will automatically be created for you.

          Note that this setting ignores the --disable-directory-creation flag.

          [default: ./deploy/acme_cache]

      --private-key-file <FILE>
          File path to the server's secret key. If missing, it will be
          created for you

          [default: ./deploy/server_keys/ssh]

      --disable-directory-creation
          If set, disables automatic creation of the directories expected by the
          application. This may result in application errors if the directories
          are missing

      --listen-address <ADDRESS>
          Address to listen for all client connections

          [default: ::]

      --ssh-port <PORT>
          Port to listen for SSH connections

          [default: 2222]

      --http-port <PORT>
          Port to listen for HTTP connections

          [default: 80]

      --https-port <PORT>
          Port to listen for HTTPS connections

          [default: 443]

      --connect-ssh-on-https-port
          Allow connecting to SSH via the HTTPS port as well. This can be useful
          in networks that block binding to other ports

      --force-https
          Always redirect HTTP requests to HTTPS

      --disable-http-logs
          Disable sending HTTP logs to clients

      --disable-tcp-logs
          Disable sending TCP/proxy logs to clients

      --acme-contact-email <EMAIL>
          Contact e-mail to use with Let's Encrypt. If set, enables ACME for
          HTTPS certificates.

          By providing your e-mail, you agree to the Let's Encrypt
          Subscriber Agreement.

      --acme-use-staging
          Controls whether to use the staging directory for Let's Encrypt
          certificates (default is production). Only set this option for testing

      --password-authentication-url <URL>
          If set, defines a URL which password authentication requests will be
          validated against. This is done by sending the following JSON payload
          via a POST request:

          {"user": "...", "password": "...", "remote_address": "..."}

          Any 2xx response indicates that the credentials are authorized.

      --bind-hostnames <POLICY>
          Policy on whether to allow binding specific hostnames.

          Beware that this can lead to domain takeovers if misused!

          [default: txt]

          Possible values:
          - all:   Allow any hostnames unconditionally, including the
                   main domain
          - cname: Allow any hostnames with a CNAME record pointing to
                   the main domain
          - txt:   Allow any hostnames with a TXT record containing a
                   fingerprint, including the main domain
          - none:  Don't allow user-provided hostnames, enforce
                   subdomains

      --load-balancing <STRATEGY>
          Strategy for load-balancing when multiple services request the same
          hostname/port.

          By default, traffic towards matching hostnames/ports will be
          load-balanced.

          [default: allow]

          Possible values:
          - allow:   Load-balance with all available handlers
          - replace: Don't load-balance; When adding a new handler,
                     replace the existing one
          - deny:    Don't load-balance; Deny the new handler if
                     there's an existing one

      --txt-record-prefix <PREFIX>
          Prefix for TXT DNS records containing key fingerprints, for
          authorization to bind under a specific domain.

          In other words, valid records will be of the form:

          TXT <PREFIX>.<DOMAIN> SHA256:...

          [default: _sandhole]

      --allow-requested-subdomains
          Allow user-requested subdomains. By default, subdomains are always
          random

      --allow-requested-ports
          Allow user-requested ports. By default, ports are always random

      --disable-http
          Disable all HTTP tunneling. By default, this is enabled globally

      --disable-tcp
          Disable all TCP port tunneling except HTTP. By default, this is
          enabled globally

      --disable-aliasing
          Disable all aliasing (i.e. local forwarding). By default, this is
          enabled globally

      --quota-per-user <MAX>
          How many services can be exposed for a single user at once.
          Doesn't apply to admin users.

          Each user is distinguished by their key fingerprint or, in the case of
          API logins, by their username.

          By default, no limit is set.

      --random-subdomain-seed <SEED>
          Which value to seed with when generating random subdomains, for
          determinism. This allows binding to the same random address until
          Sandhole is restarted.

          Beware that this can lead to collisions if misused!

          If unset, defaults to a random seed.

          Possible values:
          - ip-and-user: From IP address, SSH user, and requested
                         address. Recommended if unsure
          - user:        From SSH user and requested address
          - fingerprint: From SSH user, key fingerprint, and requested
                         address.
          - address:     From SSH connection socket (address + port) and
                         requested address

      --random-subdomain-length <LENGTH>
          The length of the string appended to the start of random subdomains

          [default: 6]

      --random-subdomain-filter-profanities
          Prevents random subdomains from containing profanities

      --requested-domain-filter-profanities
          Prevents user-requested domains/subdomains from containing profanities.

          Beware that this can lead to false positives being blocked!

      --ip-allowlist <CIDR>
          Comma-separated list of IP networks to allow. Setting this will block
          unknown IPs from connecting

      --ip-blocklist <CIDR>
          Comma-separated list of IP networks to block. Setting this will allow
          unknown IPs to connect, unless --ip-allowlist is set

      --idle-connection-timeout <DURATION>
          Grace period for dangling/unauthenticated SSH connections before they
          are forcefully disconnected.

          A low value may cause valid proxy/tunnel connections to be erroneously
          removed.

          [default: 2s]

      --unproxied-connection-timeout <DURATION>
          Grace period for unauthenticated SSH connections after closing the
          last proxy tunnel before they are forcefully disconnected.

          A low value may cause valid proxy/tunnel connections to be erroneously
          removed.

          If unset, this defaults to the value set by --idle-connection-timeout

      --authentication-request-timeout <DURATION>
          Time until a user+password authentication request is canceled. Any
          timed out requests will not authenticate the user

          [default: 5s]

      --http-request-timeout <DURATION>
          Time until an outgoing HTTP request is automatically canceled.

          By default, outgoing requests are not terminated by Sandhole.

          [default: 30s]

      --tcp-connection-timeout <DURATION>
          How long until TCP connections (including Websockets and local
          forwardings) are automatically garbage-collected.

          By default, these connections are not terminated by Sandhole.

  -h, --help
          Print help (see a summary with '-h')

  -V, --version
          Print version